There’s something undeniably nostalgic about a Carvel Ice Cream Cake. For many Americans, it brings back birthday parties, summer gatherings, and sweet, cold bites of childhood joy. Growing up, it was the showstopper of every family celebration. My grandmother would always try to “one-up” the store-bought version, and eventually, she perfected a homemade take that was even better than the original. This recipe is inspired by her, with a few modern twists.
Whether you’re celebrating a birthday, cooling off during the heatwave, or just treating yourself, this dessert is as fun to make as it is to eat. And yes, it includes that iconic crunchy chocolate layer!
Table of Contents
Why You’ll Love This Carvel Ice Cream Cake
No baking required – perfect for summer!
Customizable flavors – stick to classics or mix it up!
That famous chocolate crunch, just like the original Carvel layer!
Freezer-friendly – make it ahead for parties or gatherings.
Prep Time, Chill Time & Yield
Prep Time: 30 minutes
Freezing Time: Minimum 6 hours (preferably overnight)
Serves: 6
Ingredients
For the Chocolate Crunch Layer:
24 chocolate sandwich cookies (like Oreos), crushed
2 tbsp unsalted butter, melted
1/4 cup chocolate shell topping or melted chocolate chips
For the Ice Cream Layers:
1 quart vanilla ice cream (softened)
1 quart of chocolate ice cream (softened)
For the Whipped Frosting:
1 cup heavy whipping cream
3 tbsp powdered sugar
1 tsp vanilla extract
Optional Decorations:
Sprinkles
Crushed cookies
Maraschino cherries
Caramel or chocolate drizzle
How to Make a Carvel Ice Cream Cake at Home
Step 1: Prep Your Pan
Line an 8-inch springform pan with plastic wrap, making sure it overhangs on the sides for easy removal later.
Step 2: Build the First Ice Cream Layer
Spread the vanilla ice cream evenly into the bottom of the pan. Use a spatula or back of a spoon to smooth it out. Freeze for 30 minutes to firm up.
Step 3: Make the Chocolate Crunch
In a bowl, combine the crushed chocolate cookies with melted butter and the chocolate shell topping. Stir until the crumbs are well-coated and resemble wet sand. Spread this layer over the vanilla ice cream and gently press down.
Pro Tip: For that real Carvel crunch, don’t over-press—it should still have a nice crumbly bite!
Step 4: Add the Chocolate Ice Cream
Spread the chocolate ice cream over the chocolate crunch layer. Smooth it out evenly. Cover the entire cake with plastic wrap and freeze for at least 4 hours, or overnight for best results.
Step 5: Whip Up the Frosting
Right before serving, beat the heavy whipping cream, powdered sugar, and vanilla extract until stiff peaks form. You can also use store-bought whipped topping if you’re short on time.
Step 6: Frost & Decorate
Remove the cake from the springform pan and peel away the plastic wrap. Frost the top and sides of the cake with whipped cream. Decorate with sprinkles, cookie crumbles, cherries, or whatever makes you smile!
Customization Ideas
This Carvel Ice Cream Cake is super versatile. Here are some fun ways to customize it:
Mint Chocolate Delight: Use mint chip and chocolate ice creams, and add mint extract to the whipped topping.
Fruity Fun: Layer strawberry and vanilla ice cream with freeze-dried strawberries in the center.
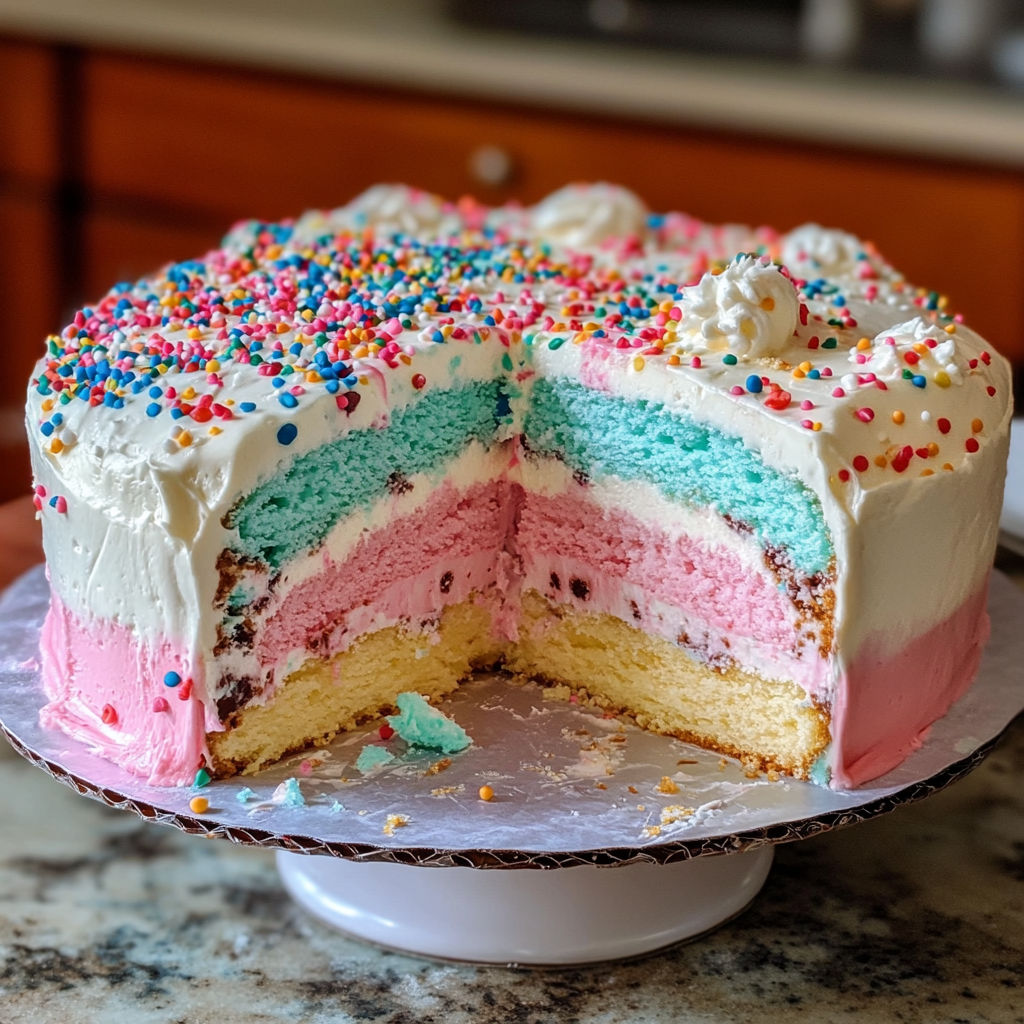
Birthday Bash: Add a layer of Funfetti cake crumbs between the ice cream layers and top with rainbow sprinkles.
Homemade Carvel Ice Cream Cake
- Total Time: 6 hours 30 minutes
- Yield: 6 servings 1x
Description
This homemade Carvel Ice Cream Cake is the ultimate frozen treat, featuring layers of creamy vanilla and chocolate ice cream, a signature chocolate cookie crunch center, and a fluffy whipped topping.
Ingredients
Chocolate Crunch Layer:
- 24 chocolate sandwich cookies (e.g., Oreos), crushed
- 2 tbsp unsalted butter, melted
- 1/4 cup chocolate shell topping or melted chocolate chips
Ice Cream Layers:
- 1 quart vanilla ice cream, softened
- 1 quart chocolate ice cream, softened
Whipped Frosting:
- 1 cup heavy whipping cream
- 3 tbsp powdered sugar
- 1 tsp vanilla extract
Optional Toppings:
- Sprinkles
- Crushed cookies
- Maraschino cherries
- Chocolate or caramel drizzle
Instructions
- Line the pan: Line an 8-inch springform pan with plastic wrap, allowing overhang.
- Add vanilla layer: Spread softened vanilla ice cream evenly in the bottom. Freeze for 30 minutes.
- Make crunch layer: Mix crushed cookies, butter, and chocolate topping. Spread over vanilla layer and gently press.
- Add chocolate layer: Spread chocolate ice cream over crunch. Cover and freeze for at least 4 hours, preferably overnight.
- Prepare frosting: Beat heavy cream with powdered sugar and vanilla until stiff peaks form.
- Frost and decorate: Remove cake from pan, frost with whipped cream, and decorate with toppings as desired.
- Serve and enjoy!
Notes
- You can use different ice cream flavors (strawberry, mint chip) to customize.
- Store leftovers tightly wrapped in the freezer for up to a week.
- Softening ice cream for 10–15 minutes makes it easier to spread.
- Prep Time: 30 minutes
- Cook Time: 6 hours
- Category: Dessert
- Method: Baking
- Cuisine: American
Nutrition
- Calories: 520
- Fat: 32g
- Carbohydrates: 55g
- Protein: 5
Storage Tips
Wrap leftovers tightly in plastic wrap or aluminum foil and keep them in the freezer for up to 1 week. For best texture, consume within 3 days.
Tips for Success
Soften ice cream just right: Leave it out for 10–15 minutes—too soft and it’ll melt, too hard and it won’t spread easily.
Use a springform pan: It makes layering and unmolding a breeze.
Chill between layers: Give each layer time to set for neat, distinct layers.
Don’t skip the crunch layer: It’s the heart of the Carvel charm!
A Cake to Celebrate, Carvel Style
There’s no doubt that Carvel Ice Cream Cake is a beloved classic—and now, you can bring it to life right in your kitchen. Whether it’s a party of two or a celebration with friends, this cake brings smiles with every slice.
So go ahead, grab a spoon (or a fork), and dig in. And if you put your own spin on it, let me know! I’d love to see how you made it your own.